In this article, I will refer to VS Code in a generic way,
but it is good to remember that there are three variants of this
editor:
Code - OSS, Visual Studio Code and
VSCodium.
Overall, these three versions only differ in licensing,
telemetry, and some default configuration items. It is important
to know that you need to use the Visual Studio Code version
distributed by Microsoft to be able to use some extensions like the
mniSharp C# Debugger (there are also issues with Remote - SSH and the Dev Containers).
Note: For more information regarding the differences between Visual Studio Code and Code - OSS, you can check out Code - OSS GitHub wiki.
Making VS Code the default commit editor
Using VS Code as your default commit editor has two advantages
over using the terminal:
If you are using commitlint, you can also use an extension (commitlint) to see live whether your commit message follows the form
required by your configuration.
To make VS Code your default commit editor, enter this command
in your terminal:
Terminal window
gitconfig--globalcore.editor"code --wait"
Note: The --wait flag allows you to avoid errors like:
"Aborting commit due to empty commit message."
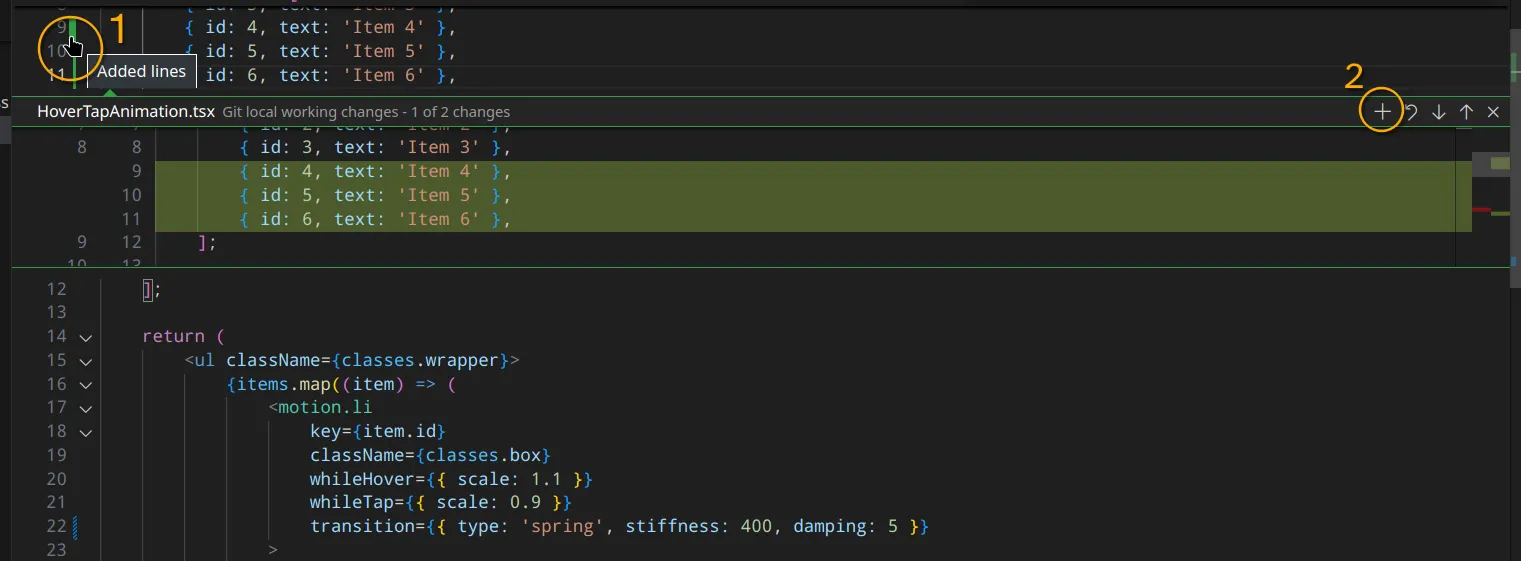
Stage specific lines with Git
If you want to stage only specific lines instead of the entire
file, you have two options:
Click the gutter on the side of your editor, then click
the + button to stage the selected code block.
You can also select the lines you want and add them with a
keyboard shortcut (Ctrl+K Ctrl+Alt+S is the default
shortcut, but you can change it to something more accessible
if needed) or the command palette.
And with the command line?
You can also index specific blocks from the command line.
Again, there are two possible approaches:
Use this command to directly select the code blocks you
want to stage for a specific file.
Terminal window
gitadd-p<file-name>
Comparing two files
Sometimes it is useful to compare two files to find the
differences between them. To do this, right-click on the
reference file and select Select for compare. Then
right-click on the file you want to compare and select Compare with selected.
Fun fact
Before I discovered this feature, I used a rather… peculiar
technique to compare the difference between two files.
As a big fan of stereograms, I realized that if I put the
files I wanted to compare side by side, I could cross-view
them and highlight the differences! Try this image to see
;-)
Keyboard shortcuts
VS Code has a substantial list of shortcuts (you can find the
full list on the official documentation site). If you feel lost by the extent of the commands to remember,
here is a small selection of the key combinations that I use
most often.
Ctrl + Enter et Ctrl + Shift + Enter: Insert a line below and above the current cursor
location, respectively. No need to go to the end of the line
and press enter!
lorem<n> : to generate dummy text
(this is an Emmet shortcut). You can adjust the number of words generated. For
example,
lorem50 will generate a dummy text of 50 words.
Alt + F5 and Shift + Alt + F5:
Navigate to the next or previous edit (with Git). However, I
find these shortcuts difficult to access and have replaced
them with Ctrl + arrow up and Ctrl + arrow down.
F8 and Shift + F8: quickly jump to
errors and warnings in the project.
Ctrl + Backspace and Ctrl + Delete: delete an entire word (from the right or from the left of
the cursor). This shortcut is not specific to VS Code and
can be used everywhere. :-)
Custom shortcuts suggestions
EIn addition to the basic shortcuts provided by VS Code, you can
create your own. You can do this either from the VS Code GUI, or from the keybindings.json file. As a suggestion, you'll find a list of shortcuts for this
file at the bottom of the list below.
Ctrl Ctrl : allows you to choose a file by
pressing the Ctrl key twice.
Shift Shift : Opens the command palette by
pressing the Shift key twice.
Ctrl + Shift + W : Closes all tabs except
the one you are currently on. You can also right-click on
any tab and select: Close others.
Ctrl + Shift + S : Saves all your edited
files. No more going back through your tabs and saving your
files one by one.
Ctrl + Shift + < : Allows you to fold
and unfold the code at the cursor position.
keybindings.json
[
{
"key": "ctrl ctrl",
"command": "workbench.action.quickOpen"
},
{
"key": "shift shift",
"command": "workbench.action.showCommands"
},
{
"key": "ctrl+shift+w",
"command": "workbench.action.closeOtherEditors"
},
{
"key": "ctrl+shift+s",
"command": "workbench.action.files.saveFiles"
},
{
"key": "ctrl+[IntlBackslash]",
"command": "editor.toggleFoldRecursively",
"when": "editorTextFocus && foldingEnabled"
}
]
Custom snippets
In addition to the default IntelliSense snippets, you can create
your own Snippets personnalisés. As with the keyboard shortcuts section, I will describe the
list of the ones I think are the most useful and provide the
corresponding configuration file.
l : to simply do a console.log();. This operation is so frequent that it fully deserves a
snippet.
.ts .tsx .js .jsx
{
"Print to console": {
"prefix": "l",
"body": ["console.log('$1');", "$2"],
"description": "Log output to console"
}
}
Extensions
Here are the extensions that I consider to be the most useful
and that I use regularly.
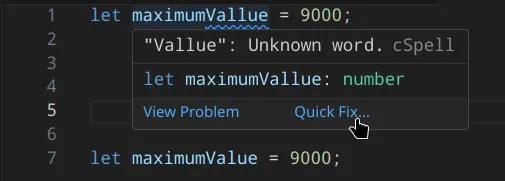
Code Spell Checker
Code Spell Checker is a must-have for me. This extension allows you to highlight spelling
mistakes in your code. Besides the obvious usefulness when writing
comments or Markdown documentation, you can also detect naming issues for your variables.
For example, naming your variable maximumVallue will
highlight it and you will have the option, by hovering your cursor
over the variable, to apply a correct spelling.
Note: If you are using another language besides English, you
will need to add an additional extension for your language. For
example, to add French to the general dictionary, you will need
to download French - Code Spell Checker.
In my opinion, it's the only appearance element worth modifying.
Thanks to the Material Icon Theme, you'll be able to see more easily what type of file you're
working with. Here's a quick comparison with the file explorer
view on an Angular project without this extension:
Now here is the same view with the extension:
Without the extension, all TypeScript files looked similar,
which can make navigation more cumbersome. With the extension,
each file type has a distinctive appearance.
Better Comments
Better Comments makes it easier to find your comments by adding colors.
CSS Modules
If you are using CSS Modules with React, this extension will be very useful for you! It adds autocompletion when entering
the class name in your JSX, and you'll also be able to go to the
class definition.
CSS Variable Autocomplete
Be careful, several extensions have a similar name. CSS Variable Autocomplete is the one I find most effective to add autocomplete in a more
consistent way when using CSS variables. I think that in the future
we will not need this extension anymore but for now I consider it
necessary.
SVG
I mainly installed the SVG extension so I could preview these files in my IDE, but I recently
discovered that some other cool features came with it (autocompletion,
built-in documentation, and more).
A handy extension to have if you have set up a commit convention
with commitlint. You will be able to see in real time if your commit message
is consistent with your configuration.
LaTeX Workshop
One last extension that is quite specific but I mention it
because I use it and like it. LaTeX Workshop gives you a framework to use LaTeX within VS Code. It depends on the mood. You can also add
LTeX – LanguageTool grammar/spell checking to launch an offline instance of LanguageTool, allowing advanced text checking.